If you’ve ever captured a perfect moment with your camera, only to find that the image turned out slightly blurry, you’re not alone. Blurry photos can be frustrating, but there’s a solution at your fingertips – Adobe Photoshop. In this guide, we’ll walk you through the steps to unblur an image in Photoshop and restore it to its crisp, clear glory.

Why Do Photos Get Blurry?
Before we dive into the Photoshop magic, it’s essential to understand why photos get blurry in the first place. Blurriness can result from various factors, such as camera shake, low light conditions, or even an out-of-focus subject. Knowing the root cause can help you prevent it in future shots.
Step 1: Open Your Image in Photoshop
– Launch Photoshop and open the blurry image you want to enhance.
Step 2: Duplicate the Image Layer
– Before making any changes, creating a duplicate layer of your image is wise. This step ensures that your original image remains intact, and you can always start over if needed.
Step 3: Sharpen the Image
– In the top menu, navigate to “Filter” > “Sharpen” > “Unsharp Mask.” This tool will allow you to enhance the sharpness of your image.
Step 4: Adjust the Unsharp Mask Settings
– A dialog box will appear, providing you with various settings to tweak. The key parameters you can adjust are:
– Amount: This controls the intensity of sharpening. Start with a low value and gradually increase it until the image looks sharper but not oversharpened.
– Radius: This affects how many pixels around edges are sharpened. A smaller radius works best for fine details.
– Threshold: Adjust this to control which areas get sharpened. A higher threshold will prevent noise from being enhanced.

Step 5: Compare and Fine-Tune
– After applying the Unsharp Mask, compare your edited image to the original. You can do this by toggling the duplicate layer’s visibility on and off. Make additional adjustments if necessary.
Step 6: Save Your Enhanced Image
– Once you’re satisfied with the result, go ahead and save your image. You can choose to save it in various formats, such as JPEG or PNG, depending on your needs.
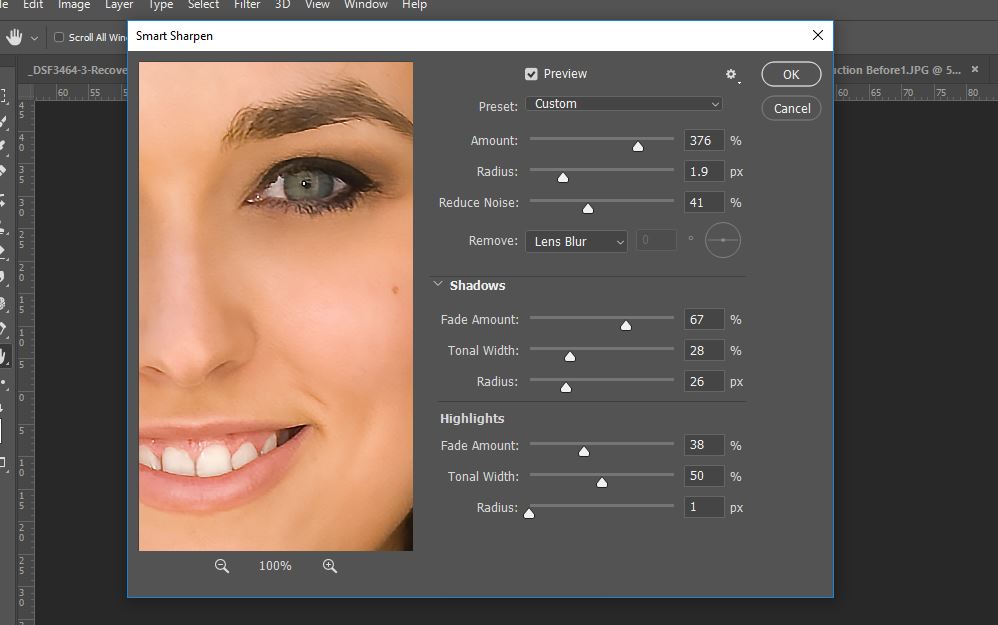
Step 7: Additional Enhancements
– Depending on the quality of your image and your specific requirements, you might want to explore other Photoshop tools, such as the “Smart Sharpen” filter, to fine-tune the sharpness further.
Tips for Best Results
– Use a tripod or stable surface when capturing images to minimize camera shake.
– Shoot in well-lit conditions to reduce motion blur.
– Ensure your camera focuses correctly on the subject.
– Don’t oversharpen, as it can introduce artifacts and make the image look unnatural.
Unblurring an image in Photoshop is a valuable skill for photographers, designers, and anyone who wants to salvage a memorable but slightly blurry photo. With the right tools and techniques, you can transform your imperfect shots into stunning, clear visuals.
Conclusion
Experiment with different methods and settings to find the approach that works best for your specific image and desired outcome. With practice and patience, you can transform blurry images into sharp, visually captivating masterpieces.
Don’t let blurry photos get in the way of sharing your precious moments. With Photoshop and these step-by-step instructions, you can unblur your images and make them shine.